
Imagine that you’re 12 worksheets into a financial plan and you need to sum all the subtotals from each worksheet. The thought of creating some long formula that will probably need to be changed later may make you cringe. You know there must be an easier way to do this and, fortunately for you, there is: named ranges.
Named Ranges
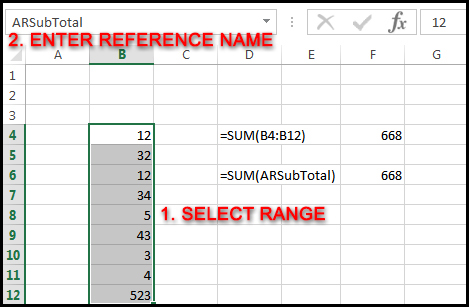
Named Ranges provide meaning to the cells in an Excel worksheet. A named range can refer to a single cell, an area of cells or cells that are scattered throughout a worksheet. Named ranges can then be used in place of cryptic cell references in formulas and VBA code. You don’t need to remember that B4 to B12 is the accounts payable subtotal because you named it APSubTotal and now the formula bar displays the formula as SUM(APSubTotal) instead of SUM(B4:B12).
How are Named Ranges Created?
There are a few methods for creating named ranges. The easiest is using the reference window while working on an Excel worksheet. In the upper left portion of the Excel environment is a small box which contains the cell name of the selected cell. A1, C10, etc. Click inside this box and type in a name then hit enter. You have now assigned that name to the cell or cells you had selected. Simple enough, but what if I made a mistake. That leads us to use the 2nd method of working with reference names, the Name Manager.
Add, Edit and Delete Ranged Names with the Name Manager
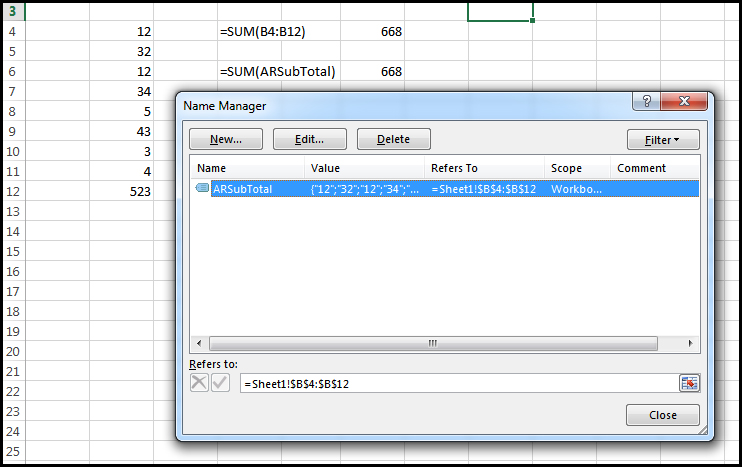
The Name Manager is located on the Formulas Tab in Excel. With the Name Manager, you can create, edit, and delete named ranges. In addition, you can create customized and dynamic situations. Clicking on Name Manager will bring up a window which displays the name, current values of the referenced cells, the current cell references, and the scope of the name. If a mistake was made in setting up a named range, simply click on the reference that needs to be changed, click Edit and make the change. If the reference is no longer needed, then delete it.
Named Ranges and VBA Code
Cell references, such as B4:B12 can be used in formulas within worksheets and VBA code. When rows and columns are inserted and deleted, cell references can change. In Excel workbooks, these cell references are automatically updated. However, any VBA code containing cell references is not automatically updated. Instead, these references need to be manually updated within the VBA code unless named ranges are used, instead.
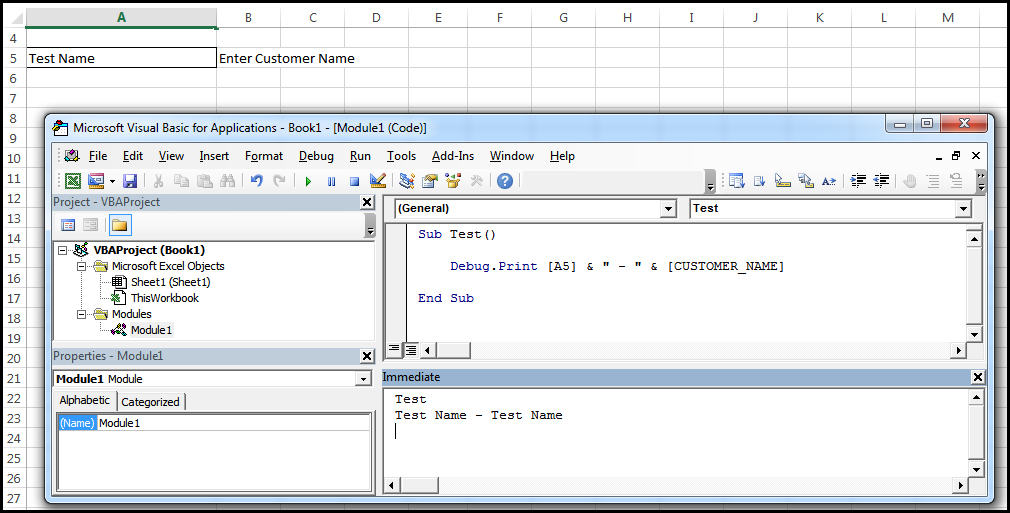
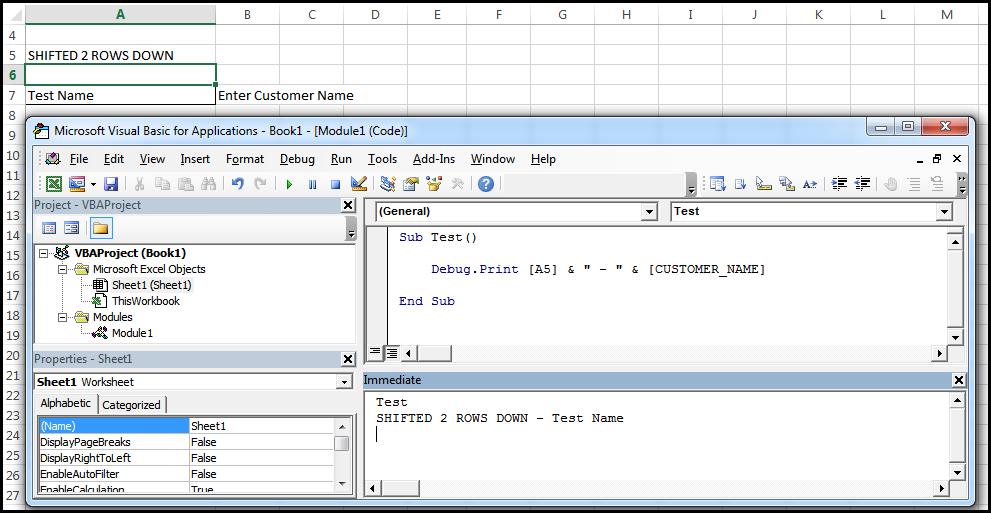
For instance, if the location of a customer name is cell A5 and two new rows are inserted above the customer name on the worksheet, the new cell location is A7. Without employing the use of named ranges, the VBA code now needs to be changed from A5 to A7. On the other hand, if we had named cell A5 as CUSTOMER_NAME and then inserted two rows above it, the cell reference for CUSTOMER_NAME would automatically be updated. If CUSTOMER_NAME were used in the VBA code, no coding updates would be necessary.
Dynamic Ranges
This concept of updating goes even further when you consider this scenario; if there is a need to have the named range change in size depending on the size of the data set. This scenario can be written in VBA with some work but still runs into the same updating issue. A Dynamic Range can be created using the Name Manager on the Formulas tab by using the OFFSET and COUNT functions in the definition of the named range.
OFFSET AND COUNT Functions in Dynamic Named Ranges
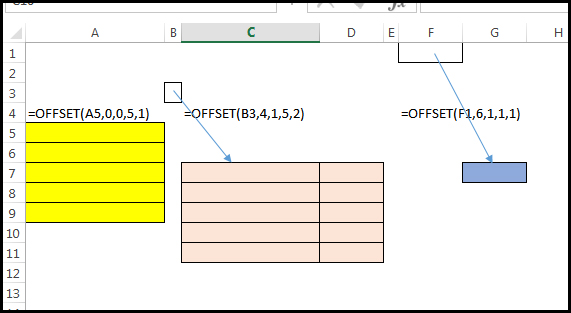
In the Name Manager, create a new or edit an existing name that you want to be dynamic in size. In the “Refers To” column of the Name Manager, a cell reference such as Sheet1!$B$3 is defined as Cell B3 on Sheet 1. For this cell reference to include more cells as items are added to cells B4, B5 and so on, the OFFSET function is needed. OFFSET is a powerful function that will return a range of cells based upon 5 inputs: Start Location, Offset Rows, Offset Columns, Size Rows, Size Columns.
OFFSET(A5,0,0,5,1) would return the group of cells from A5 down to A10. Start at A5, 0 offset in the rows and columns from A5, 5 rows long by 1 column wide.
OFFSET(B3,4,1,5,2) would return the group of cells C7 to D11. Start at B3, offset 1 column to the right, 4 rows down and then return an area that is 5 rows long and 2 columns wide.
By coupling the OFFSET with COUNT or COUNTA the OFFSET will return an ever changing range.
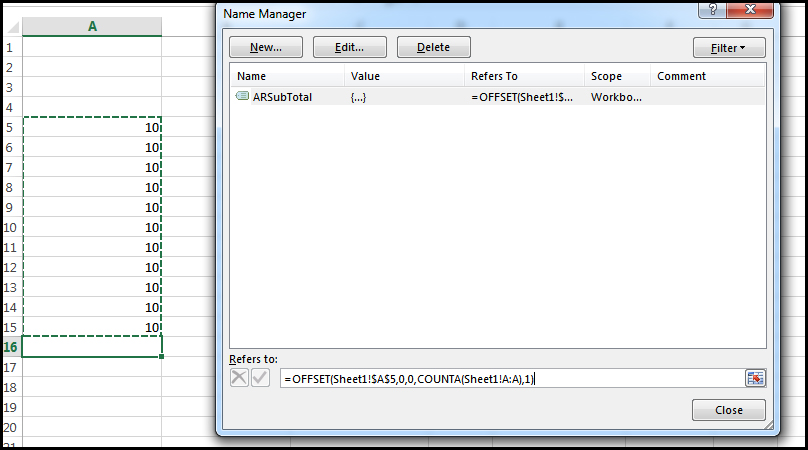
OFFSET(A5,0,0,COUNTA(A:A),1) This would return a group of cells starting at A5, 0 offset in rows and columns, which extends from A5 as far down as there are values in column A.
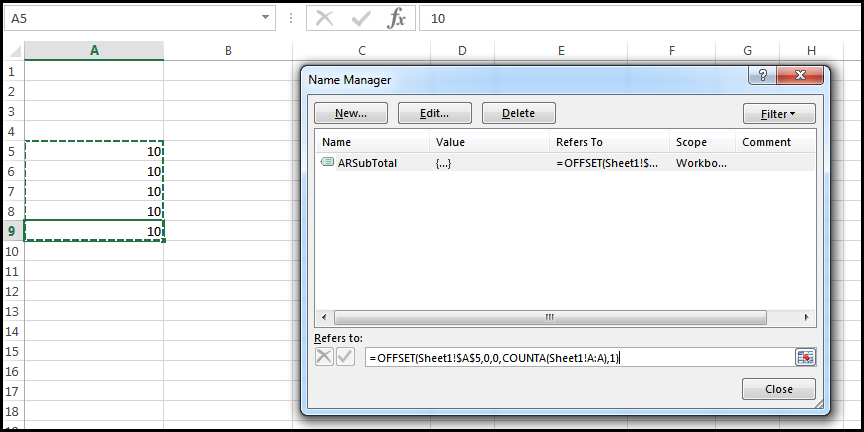
By just adding new values to the list, they will automatically get grouped into the named range, ARSubTotal
Verbose VBA
Another benefit of using a named range is that it can make your code much easier to understand. For instance, consider the code in the images below.
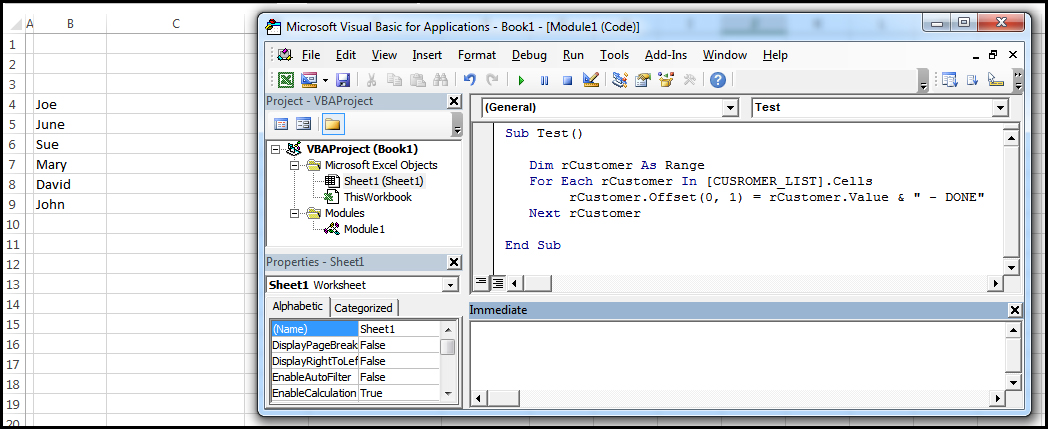
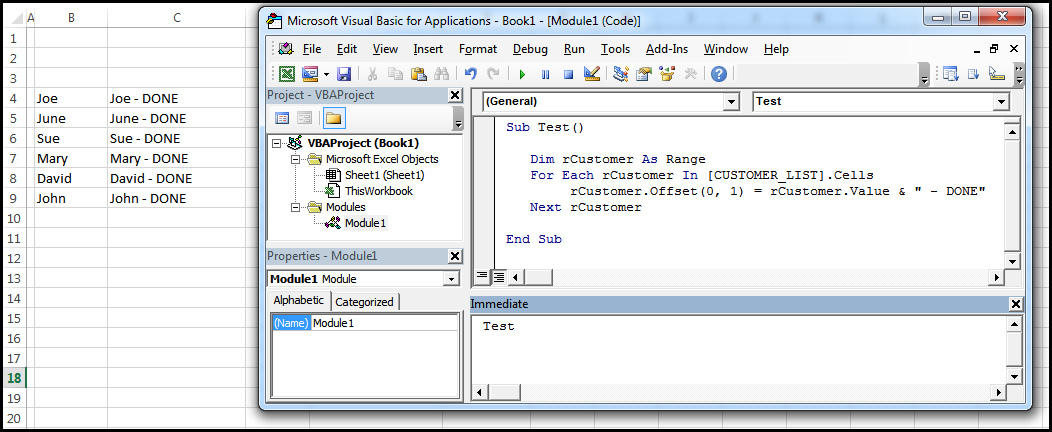
By using the named range in the code, it becomes much easier to follow the processes which are occurring and allows for fewer comments in the code. It also does not require the VBA code to be adjusted if the length of the list changes. The OFFSET-COUNT combination handles all the expansion and contraction of the list so the code can simply look at the list as a whole unit rather than some collection of cells. If you were to insert some rows, the OFFSET-COUNT if would adjust as well and not require the VBA to be updated in order to continue to function as intended.
Whether you simply need a subtotal or a more complex and integrated solution, utilizing names ranges will allow your Excel workbooks to grow with minimal need for adjustment or support.